
Short answer: to make a hanging indent in Word, select the paragraphs, go to Home and open the Paragraph settings with the small arrow in the Paragraph group, choose Hanging under Special and select OK. The fastest way on Windows is the shortcut Ctrl + T (Command + T on a Mac). The first line stays at the margin and every line after it moves in, usually by 0.5 inch: the spacing the MLA recommends for works-cited lists.
Every step below comes from Microsoft Support, checked in November 2026, for Word for Microsoft 365, Word 2024, 2021, 2019 and 2016 on Windows and Mac, plus Word for the web.
- Paragraph box: Home > Paragraph dialog launcher > Indents and Spacing > Special: Hanging > OK
- Shortcut: Ctrl + T on Windows, Command + T on a Mac (Ctrl + Shift + T removes it)
- Ruler: View > Ruler, then drag the upper triangle of the lower marker
- Word for the web: Home > Paragraph dialog launcher > Special: Hanging
- Size: set it in the By box; 0.5 inch is the MLA and APA standard
Table of Contents
What is a hanging indent in Word?
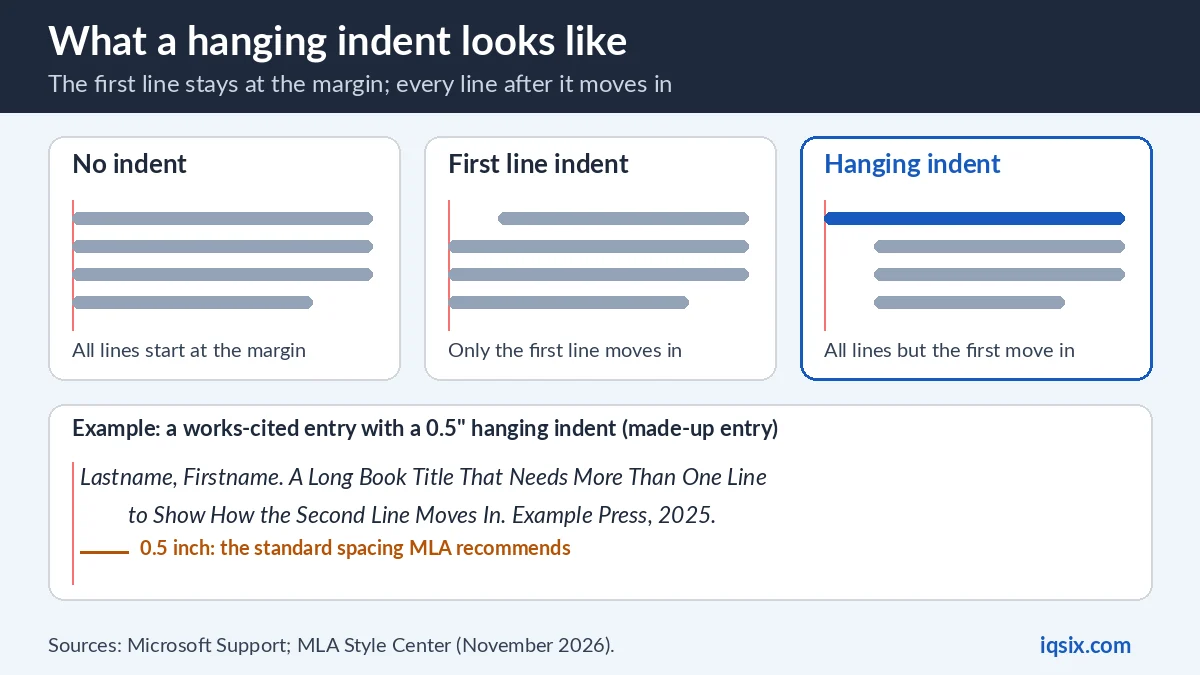
Microsoft’s definition: “A Hanging indent, also known as a second line indent, sets off the first line of a paragraph by positioning it at the margin, and then indenting each subsequent line of the paragraph” (Microsoft Support). A hanging indent in Word is the opposite of a normal first-line indent: the first line sticks out to the left, and the rest of the paragraph hangs under it.
You see it most in reference lists. The MLA recommends hanging indents for works-cited entries “because they help readers see where an entry begins” (MLA Style Center), and APA Style uses a 0.5-inch hanging indent for reference list entries (APA Style).
Word has four paragraph indents, and each one has its own marker on the ruler (Microsoft Support):
| Indent | What it does | Marker on the ruler |
|---|---|---|
| Left indent | Sets the left side of the paragraph; moving it moves the first line and the hanging indent with it | Square, lower left |
| First line indent | Indents the first line only | Triangle, top left |
| Hanging indent | Indents the second and all following lines more than the first | Upper triangle of the lower marker |
| Right indent | Sets the right side of the paragraph | Triangle, lower right |
Which way should you use?
| Way | Best for | Works in |
|---|---|---|
| Paragraph box | Typing an exact size, such as 0.5 inch | Word for Windows, Mac and the web |
| Ctrl + T (Command + T) | The fastest way, for one paragraph or a selected list | Word for Windows and Mac; Word for iPad with a keyboard |
| Ruler | Seeing the indent move while you drag | Word for Windows and Mac |
| Word for the web | Editing in your browser | The Paragraph box (no shortcut on Microsoft’s list) |
All four change the same paragraph setting, so you can mix them: for example, add the indent with Ctrl + T, then fine-tune its size later in the By box of the Paragraph dialog.
Way 1: Hanging indent in Word with the Paragraph box
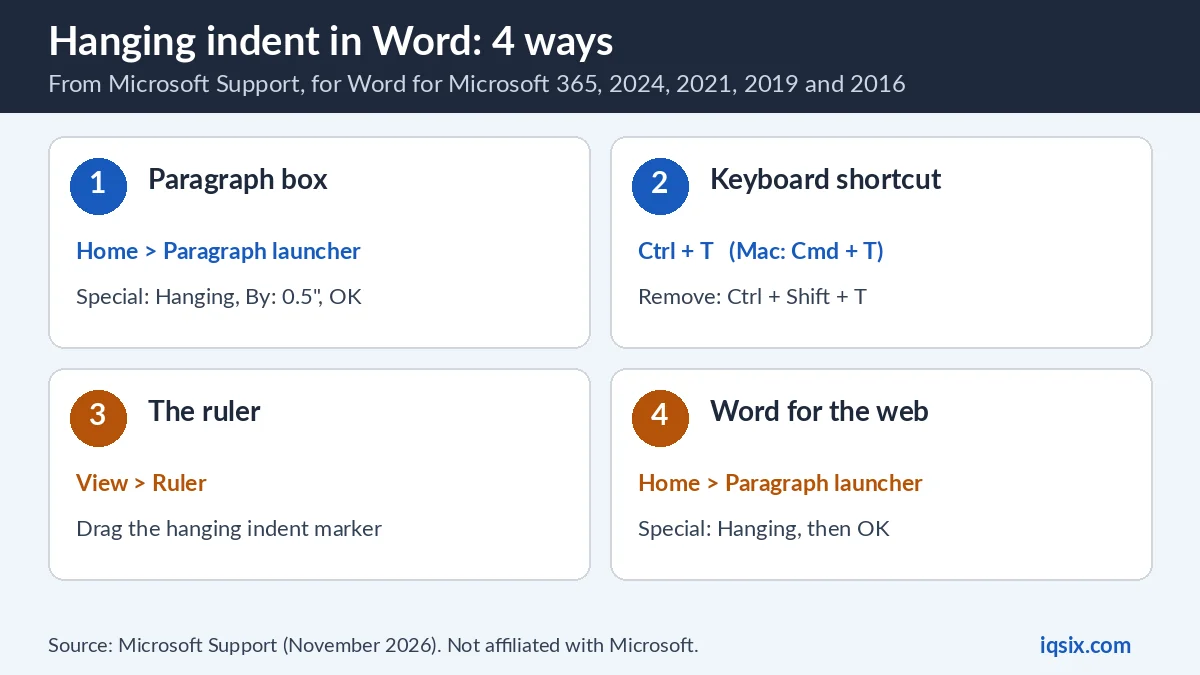
This works in every desktop version on Microsoft’s list and lets you type the exact size:
- Select the text where you want to add a hanging indent. To change a whole list, select all of it.
- Go to Home and select the Paragraph Settings dialog launcher: the small arrow in the lower-right corner of the Paragraph group. The MLA mentions another way: right-click the selected text and choose Paragraph.
- On the Indents and Spacing tab, under Special, select Hanging.
- Adjust the depth of the indent in the By box if you need to.
- Select OK.
The Preview box at the bottom of the Paragraph dialog shows how your settings will look before you apply them (Microsoft Support). According to the MLA, Word will most likely suggest 0.5 inch in the By box, “which is the standard spacing that the MLA recommends”.
Way 2: The hanging indent shortcut (Ctrl + T)
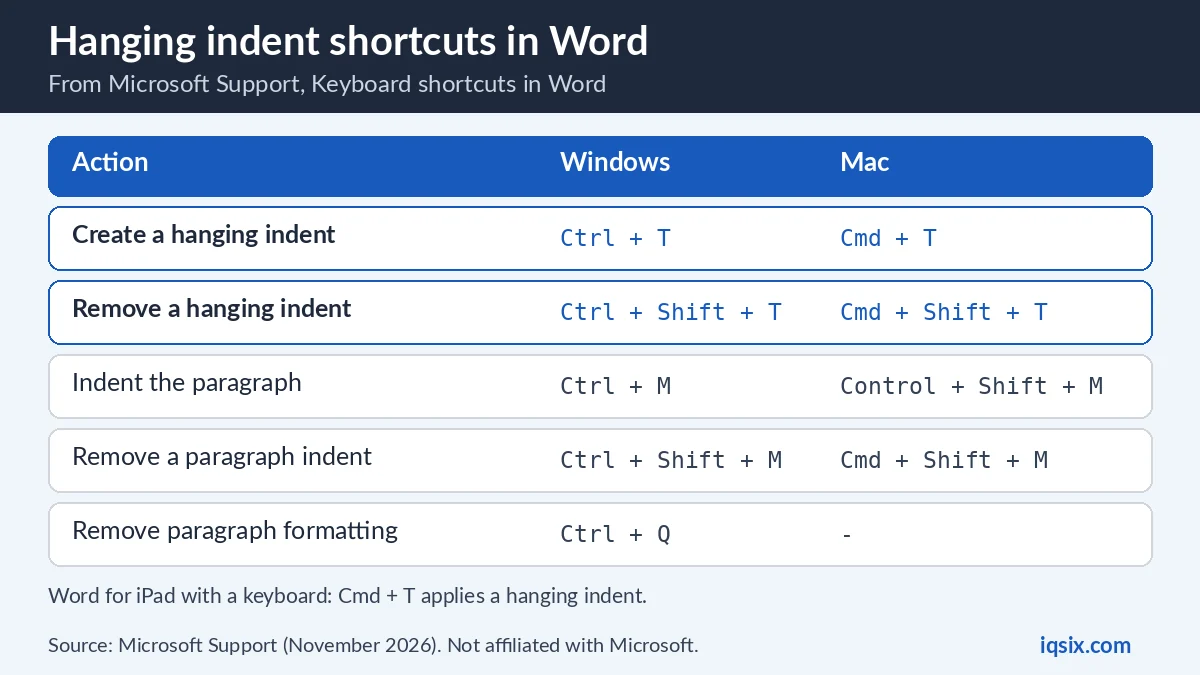
Microsoft lists these shortcuts for paragraph indents (Keyboard shortcuts in Word):
| Action | Windows | Mac |
|---|---|---|
| Create a hanging indent | Ctrl + T | Command + T |
| Remove a hanging indent | Ctrl + Shift + T | Command + Shift + T |
| Indent the paragraph | Ctrl + M | Control + Shift + M |
| Remove a paragraph indent | Ctrl + Shift + M | Command + Shift + M |
| Remove paragraph formatting | Ctrl + Q | – |
To add a hanging indent in Word this way, click anywhere in the paragraph, or select several paragraphs, and press Ctrl + T. In Word for iPad with a keyboard, Command + T applies a hanging indent too. Microsoft’s list of shortcuts for Word for the web has no hanging indent shortcut, so use the Paragraph box there.
Way 3: Drag the hanging indent marker on the ruler
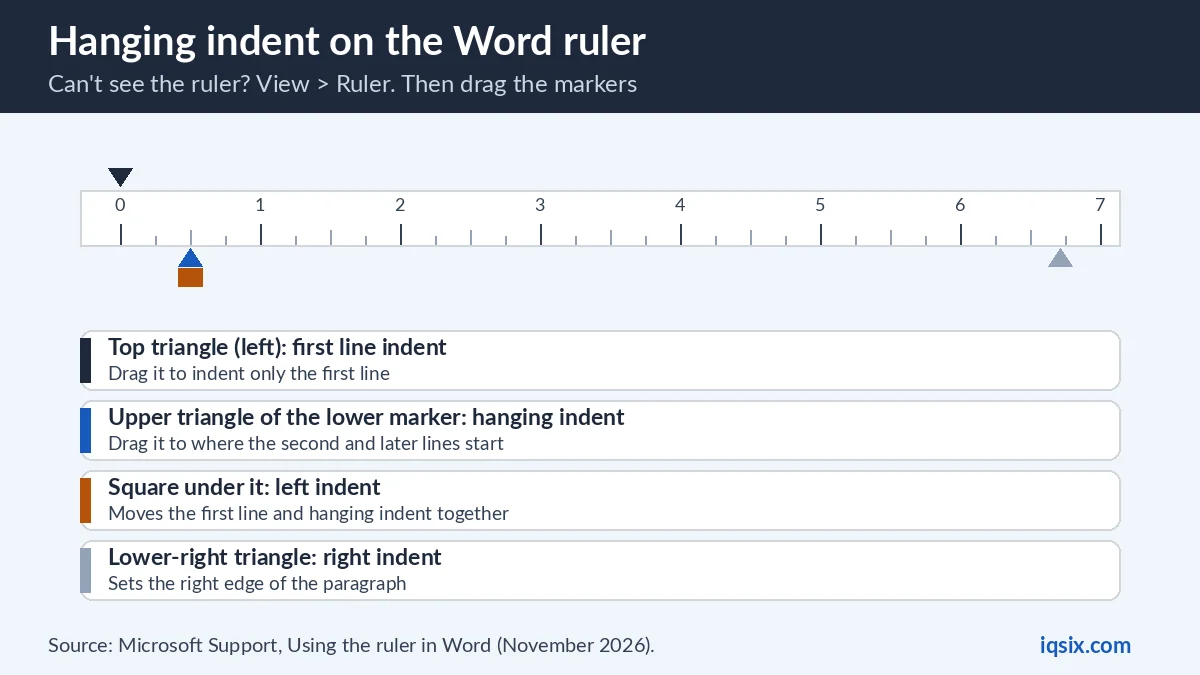
The ruler is the handiest way to set a hanging indent in Word when you want to see the result while you drag. If you don’t see it at the top of your document, go to View > Ruler (Microsoft Support). Then:
- Select the text where you want to add a hanging indent.
- On the ruler, drag the upper triangular part of the lower marker to the place where you want the indentation to start, for example to the 1″ mark.
Take care to grab the right marker. The lower marker on the left has two parts: the triangle on top is the hanging indent, and the square under it is the left indent, which moves the first line and the hanging indent together. The single triangle at the top left is the first line indent. Microsoft gives the same ruler steps for Word for Mac.
How to do a hanging indent on Word for Mac
On a Mac, the Paragraph settings are in the Format menu (Microsoft Support):
- Select the paragraph where you want to add a hanging indent.
- Go to Format > Paragraph.
- Under Special, select Hanging. Adjust the depth in the By box if you need to.
- Select OK.
The MLA adds two more ways to open the same window on a Mac: right-click the selected text and choose Paragraph, or press Command + Option + M (MLA Style Center). The shortcut works too: Command + T adds a hanging indent in Word for Mac, and Command + Shift + T removes it.
Hanging indent in Word for the web
You can also do a hanging indent on Word for the web, the free version in your browser (Microsoft Support):
- Select the text where you want to add a hanging indent.
- Go to Home and select the Paragraph dialog launcher.
- Under Special, select Hanging, and adjust the depth in the By box if you need to.
- Select OK.
Can’t find the button? Your document may be open for viewing only. Microsoft’s tip: next to Share in the upper right, open the Viewing list and select Editing (Microsoft Support).
Hanging indent for MLA and APA reference lists
Both styles format every entry in the reference list as one paragraph with a hanging indent, which, in the MLA’s words, helps readers see where an entry begins. The MLA Style Center says Word “will most likely have the default spacing of the hanging indent set to 0.5 inches, which is the standard spacing that the MLA recommends” (MLA Style Center). APA Style also asks for a 0.5-inch hanging indent on reference list entries (APA Style).
To add a hanging indent in Word to a whole list in one go:
- Type or paste your list with one entry per paragraph: press Enter only at the end of each entry.
- Select the whole list.
- Press Ctrl + T (Command + T on a Mac), or open the Paragraph box and choose Special: Hanging, By: 0.5″.
- Check the By value. If your teacher or journal asks for another size, change it there.
Don’t build the indent with spaces or the Tab key at the start of each line. A hanging indent is a paragraph setting, so Word keeps the second and later lines indented when you edit an entry and its lines move.
How to remove a hanging indent in Word
- Shortcut: select the paragraphs and press Ctrl + Shift + T (Command + Shift + T on a Mac).
- Just added it by mistake? Undo with Ctrl + Z.
- Start over: Ctrl + Q removes all paragraph formatting from the selected paragraphs, not just the indent.
Make a hanging indent the default
In the Paragraph box on Windows, Microsoft says: “If you want to save the settings you chose as your default, select Set as Default” (Microsoft Support).
Microsoft’s other way is to change the Normal style: on the Home tab, right-click Normal, choose Modify, then Format > Paragraph, and set the indent on the Indents and Spacing tab. Microsoft shows this for a first-line indent (Microsoft Support); the same Special list has Hanging. Tick New documents based on this template before you select OK if you want it in every new document.
Think twice before you change Normal: every paragraph in that style gets the hanging indent. For one reference list, Way 1 or Way 2 is usually enough.
Hanging indent in Word not working? Quick fixes
- Only one paragraph changed: an indent applies to the paragraphs you select. Select the whole list first, then apply it again.
- An entry breaks in two: each entry must be one paragraph. If you pressed Enter in the middle of an entry, the rest starts a new paragraph at the margin; delete that break.
- Lines don’t line up: look for spaces or tabs typed at the start of a line and delete them, so Word can wrap the text itself. Text pasted from a website? See how to clear formatting in Word. Need a line between sections? See how to add a line in Word.
- The wrong part moved on the ruler: you dragged the square (left indent) or the top triangle (first line indent). Press Ctrl + Z and drag the upper triangle of the lower marker instead.
- No ruler on screen: go to View > Ruler.
- Indent too big or too small: change the number in the By box (0.5 inch for MLA and APA).
- Word for the web shows no Paragraph settings: switch from Viewing to Editing.
Word keeps freezing or closing while you edit? Repair Office: see how to repair Microsoft Office Click to Run. Lost a document in a crash? See how to recover an unsaved Word document.
Get Microsoft 365 from IQSIX

Word comes with Microsoft 365. IQSIX sells a Microsoft 365 Personal 1-year key with Word, Excel, PowerPoint and Outlook: the Word for Microsoft 365 version this guide covers, on Windows and Mac.
- Redeem: enter the key at microsoft365.com/setup with your Microsoft account (see how to redeem a Microsoft 365 product key).
- Delivery: by email after your payment is confirmed (or on WhatsApp if you ask).
- Payment: crypto, card, or a Remitly bank or mobile money transfer at checkout.
- Questions first? Ask us on WhatsApp or through our contact page.
Working with lists in Excel too? See how to remove duplicates in Excel and how to strikethrough in Excel. Not sure which Office to pick? Read Microsoft 365 vs Office 2024, or see all our software keys.
Hanging indent in Word: FAQ
How do I do a hanging indent in Word?
Select the paragraphs, go to Home and open the Paragraph dialog launcher, choose Hanging under Special and select OK. On Windows you can also press Ctrl + T.
What is the shortcut for a hanging indent in Word?
Ctrl + T on Windows and Command + T on a Mac. Ctrl + Shift + T (Command + Shift + T on a Mac) removes it.
How big should a hanging indent be?
MLA and APA both use 0.5 inch. The MLA Style Center says Word will most likely suggest 0.5 inch; change it in the By box if you need another size.
How do I do a hanging indent on Word for Mac?
Select the paragraph, go to Format > Paragraph, choose Hanging under Special and select OK. Command + T is the shortcut.
Can I make a hanging indent in Word for the web?
Yes. Select the text, go to Home > Paragraph dialog launcher, choose Hanging under Special and select OK. Switch to Editing first if the document is open for viewing only.
How do I remove a hanging indent?
Select the paragraphs and press Ctrl + Shift + T on Windows or Command + Shift + T on a Mac. Ctrl + Q removes all paragraph formatting.
Sources, checked 1 November 2026: Microsoft Support – Create a hanging indent in Word, Using the ruler in Word, Keyboard shortcuts in Word, Adjust indents and spacing and Indent the first line of a paragraph; MLA Style Center – Hanging Indents and Microsoft Word; APA Style – Reference list setup. IQSIX is not affiliated with Microsoft, the MLA or the APA.